Jörgs Motorcycle pages: Navigation and GPS
Home |
Motorcycle Pages |
Links
This page is summarizes some notes and ideas about navigation, in particular using GPS.
Most of it is related to my own experience and to the instrumentation I use (at present a Garmin unit).
Why GPS?
My GPS Hardware:
GPS Receiver |
Handling maps |
SD card |
GPS switches off on battery?
GPS on the motorcycle:
Holder |
Cabling |
GPS reset on engine start?
GPS Software:
Software |
Linux
On the Trip:
Preparation |
Caveats |
Navigation |
Send GPX from the command line |
Using QLandkarte GT |
Using gpsd
I like maps. Paper maps.
I have been successfully navigating with paper maps for more than 20 years and they are still my primary and preferred means to plan a trip.
While I have been "playing around" with various GPS receivers (GPSr) in the past, it was only in 2006 that I acquired such a unit with the
accompanying map software.
For me, a GPSr does not replace the map. A GPSr does not give you the "big picture" and it cannot match the flexibility of a plain
old paper map. During a ride, I still keep a map at hand, since I like to have some information about the region that I'm riding through
- e.g. topography ... and in addition, I simply like the touch and feel of paper :-)
However, a GPS does one particular thing that no map can do: It tells you where you are. It locates you on the map.
While this may not be important on well-marked roads or in areas that you are familar with, it can become important in completely
unknown area, an unknown city, or at night. A GPSr with a "moving map" display gives you a very good idea of where you are,
and whether or not you are approaching e.g. an intersection. In addition, it gives you the "bread crumb" trail of where you have been.
Add to this features such as the calculation of the estimated time of arrival, which can be very useful - think catching the ferry.
Originally, I was looking for a GPSr mainly since I wanted to be able to re-trace my way after a nice trip. The use of the GPSr as a "real"
navigational aid was intended only for particular occasions - either when I could not use the map easily (at night or in a downpour),
or when I needed to get to a certain address in an unknown city.
Yet this has changed quickly with the use of maps that support routing: I use it frequently - not to say "almost always" - for navigation,
even if I have thoroughly outlined the trip before. More on this below.
In spring 2006, I acquired a second-hand Garmin GPSmap 60CS. It is a compact, lightweight instrument, roughly the size of an old cell phone.
Since it is not dedicated for automotive use but a true "handheld", I frequently use it for hiking and sometimes also on the bicycle.
A review of this instrument can be found e.g. at gpsinformation.us.
In the same year, Garmin replaced the 60CS by the 60CSx series; the main differences on the hardware side are the use of generic MicroSD storage cards,
a more sensible receiver and the possibility to power the instrument over USB. I acquired such a receiver, a GPSmap 60Cx, in 2010 and sold the "obsolete" 60CS.
I am still using the same instrument in 2021. The unit shows clearly visible signs of wear and tear, but it still works well.
In 2018 I acquired yet another, similar GPSr — a second-hand GPSmap 62s — that I now use mostly for hiking, yet the 60CS remains my favorite unit for motorcycling.
What I like very much is the hardware ... the instrument is compact, pretty much water- and dustproof and has an excellent transreflective display:
The brighter the sunshine, the better it is readable! Battery life is reasonable; if the instrument is powered from a pair of rechargable
AA batteries, lifetime is at least 12 h (as long as you don't use the backlight, or the compass on the "S" models).
The things that I dislike on the 60 series all refer to the software. In particular the routing is ... well, "special":
Routes are always recalculated, i.e. you cannot just download a route into the GPSr and follow it. The Garmin 60 will always
perform a recalculation when you start navigating a route. This may cause large deviations between the two calculations;
more on this below.
Switching from the GPSmap 60CS to the GPSmap 60Cx, I noted a few points:
- Memory: The 60CS has "only" 56 MB of memory. This is enough for local trips, but will quickly get tight on longer trips.
This is no longer an issue with the 60Cx and CSx; a 2-GB microSD card can hold most road data of central Europe.
Since uploading such an amount of map data to the GPSr takes a long, long time (the 60Cx still features the slow USB-1 standard), you want to use a separate card reader.
- Logging: The Cx can be set to log every trip on the SD card automatically. There is no more need to download the tracks at the end of the day to a PDA.
- Power: The Cx - not the CS - can be powered through USB. This comes in handy when you operate the unit on the computer.
- Icons: The Cx has a new set of screen icons. Personally, I perceived the "old" icons on the 60CS as clearer and easier to identify.
- Guidance: I have the impression that the "next turn pop-up" shows up later on the Cx than on the CS. At the same time, the acoustic signal is weaker. In short, the CS was better!
- User maps: Display settings for custom maps are somewhat different; "User Waypoints" show up much later on the Cx.
On the Garmin GPSmap 60 series, you transfer all maps as one big file. The GPSr then separates these maps internally.
On the GPSmap 62 series, the behaviour is different: multiple maps that are transferred in a single run are not separated.
In other words, you have to transfer the maps one by one.
The problem: Whenever you send a map with Mapsource, it is placed in a file named gmapsupp.img.
This will overwrite the last map you sent to the device (which was also named gmapsupp.img).
The fix is simple:
- Connect the unit to your computer and open the Garmin folder.
- Rename the gmapsupp.img to something else. I use names such as map-ch.img or map-ch-osm.img.
- Now send another map and repeat renaming gmapsupp.img accordingly.
- Repeat as needed - you can have many different files in the Garmin folder and they will all be recognized, as long as they have the .img extension.
Hint: set the "Map Set Name" in Mapsource accordingly so that you can recognize the different maps later on.
Source: forums.garmin.com (retrieved 2019-01, link seems to be dead by 2019-08?)
The latest firmware version of the 60Cx allow the use of microSD cards of at least 8 GB. However, these units seem to have their own mind - not all cards are recognized equally well by the GPSr.
- Even with a brand-new card, I always perform an in-depth formatting with the official tool of the SD-Card Association.
The difference in speed between the factory formatting and this tool can be striking; a working but sluggish 8-GB card from Adata became lightning fast after using this tool.
- You can test your card by connecting the GPSr to a PC, putting the GPSr into Mass Storage mode and inserting the SD card into the slot while the GPSr is running
(it is powered via USB — no need to use batteries).
If the card is recognized by the GPSr, it will immediately show up as mass storage medium, i.e. disk drive.
- Brands that do work for me: Transcend, Sandisk, Adata, eekoo.
- Brands that do not work for me: Intenso.
In 2016, my GPSmap 60Cx started to shut down all by itself when running on batteries.
The problem occurs only when the unit runs on batteries, not when powered through the Garmin connector or USB.
The display just fades out, like a power failure.
It turned out that this is actually a power failure.
The problem is well-known and is related to the internal battery connectors; these are two clips that press against contact pads on the main PCB.
Over time, these connectors seem to lose their elasticity.
The fix is to solder to short wires between the battery clips and their counterparts on the main PCB.
I did this in July 2016 but did not take pictures ;-)
The procedure is straightforward and has been described elsewhere; you may want to do a web search for "gpsmap 60cx battery failure" or similar terms.
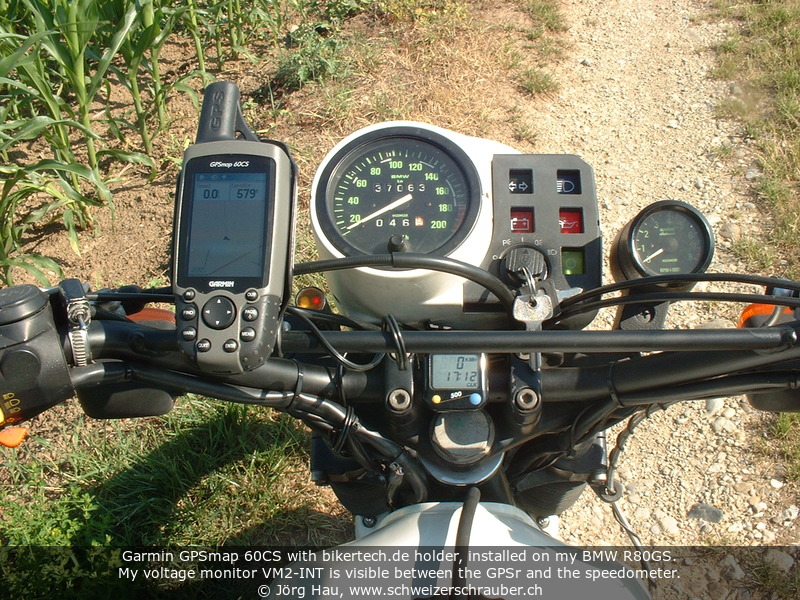
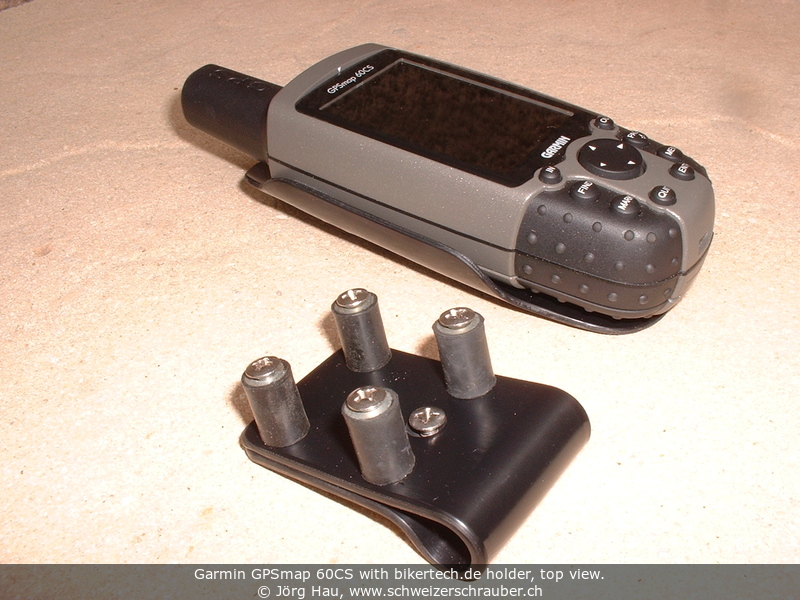
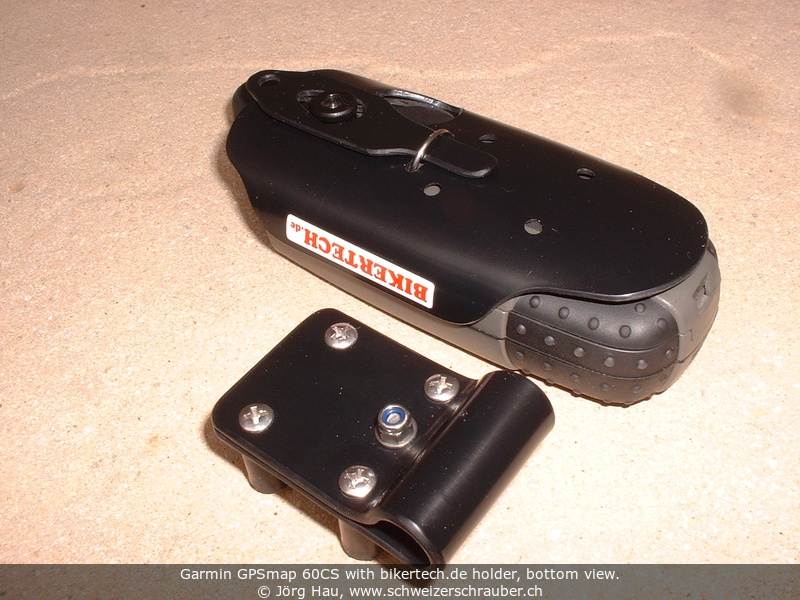
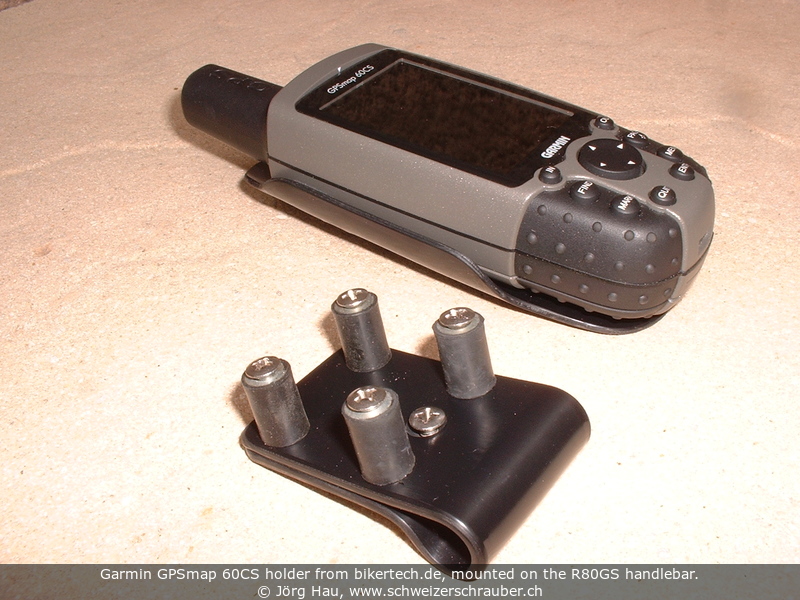
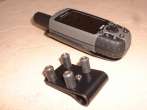
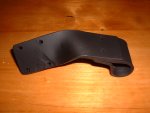
To install the GPSmap 60 series on my motorcycles, I obtained a GPS holder from
bikertech.de.
The device is made from black plastic (I presume this is a thermoplastic PVC like "Trovidur") and is a very simple, lightweight construction.
Basically, the GPSr sits in a plastic shell and is held in place with another
plastic strip that pulls the metal loop on the back of the instrument into the shell.
The shell itself sits on four rubber dampers (10×15 mm, M4 thread and bolt).
It sounds simple, it is simple - and it works fine!
Manufacturing quality could still be improved a bit, since the four rubber dampers of my unit are not perfectly aligned but
mounted under tension, thus not providing the best vibration absorption possible.
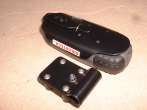
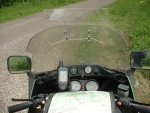
On the R80GS, this "shell" is simply attached to a flat piece of plastic that is clamped to the
12-mm cross tube of the handlebar. It is mounted on the left side of the bar, easily reachable with the left hand
and at the same eye level as the other instruments. The only thing I needed to change was to relocate the LED Voltmeter
a bit, since it would have been hidden by the GPSr.
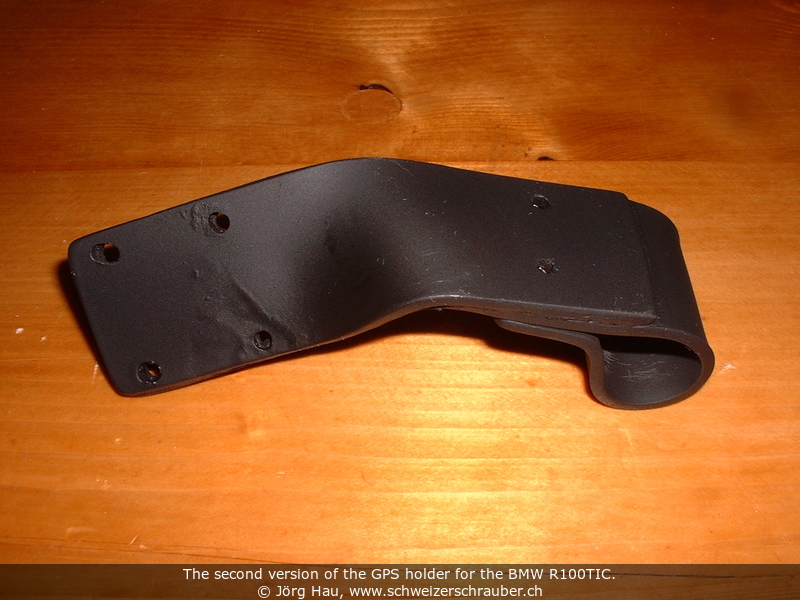
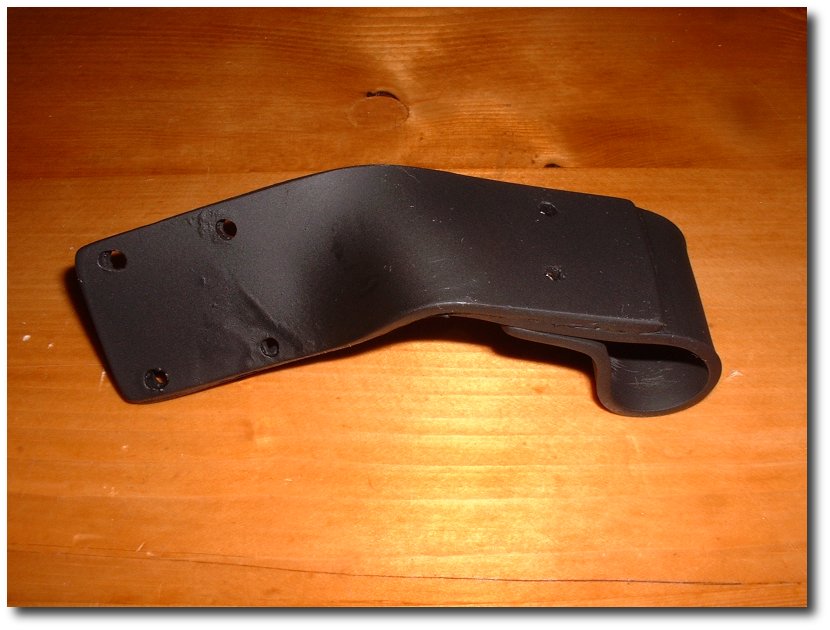
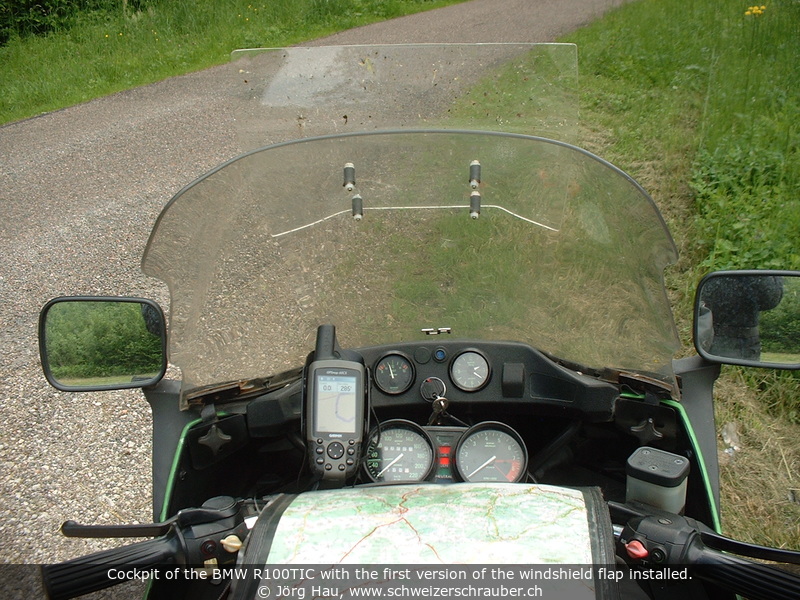
For the R100TIC, finding a suitable place and holder was more difficult. Mounting the GPSr
into the fairing puts it too far from the rider, so the handlebar turned out to be the preferred place again.
The exact position has to be chosen carefully, since you don't want the GPSr to collide with the windshield or other things.
Based on the device described above, I made a simple holder from some clear plastic and brought it into shape with a hot-air gun.
While this item survived several thousand km without any problems, it nevertheless became brittle over time.
Thus, I constructed the replacement from thermoplastic PVC (and at the same time, I copied the holder for the GPSr ;-).
The key point for the construction is that the holder has to be rather stiff; if the material is too thin, the vibrations of the Boxer engine would cause it to wiggle with a rather big amplitude.
The resulting mounting position is just perfect: comfortable to reach with the left hand and sufficiently high above the speedometer so that it would never be hidden by the tankbag.
For the K100LT, the position was similar to that on the RT, but lower to the handlebar. Pictures to come.
- Yet another description, including a car holder, at desert-info.ch (pdf, in German).
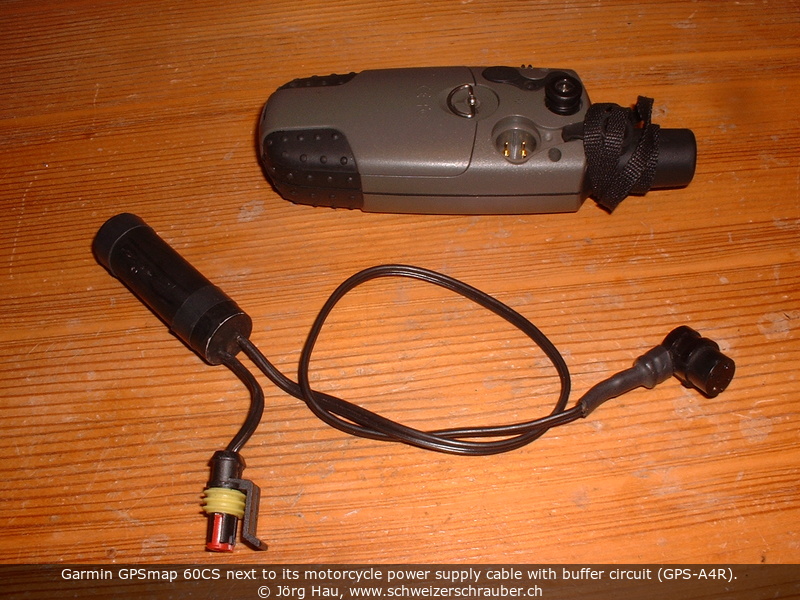
 Most (older) Garmin GPS receivers use a special, round 4-pole plug to connect to the computer and to provide external power to the instrument.
This connector is a proprietary design that is not available in standard electronic shops, but it can be obtained from
pfranc.com ...
and as a side note: since January 2009, I am the pfranc contact for Switzerland :-)
Most (older) Garmin GPS receivers use a special, round 4-pole plug to connect to the computer and to provide external power to the instrument.
This connector is a proprietary design that is not available in standard electronic shops, but it can be obtained from
pfranc.com ...
and as a side note: since January 2009, I am the pfranc contact for Switzerland :-)
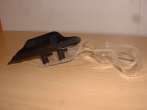
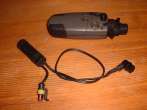
Since I change between two motorcycles, I built a short two-wire cable with this connector on one end,
and an "AMP Superseal" connector at the other (the latter are connectors for automotive applications that are completely waterproof
- thanks to Stephan H. for the hint).
On both motorcycles I installed two cables that lead from the auxiliary plug (i.e. a fused line) into the cockpit, ending in the complementary
Superseal connector. To swap bikes, I just pull the plug open and move the GPSr with its power cable to the other bike.
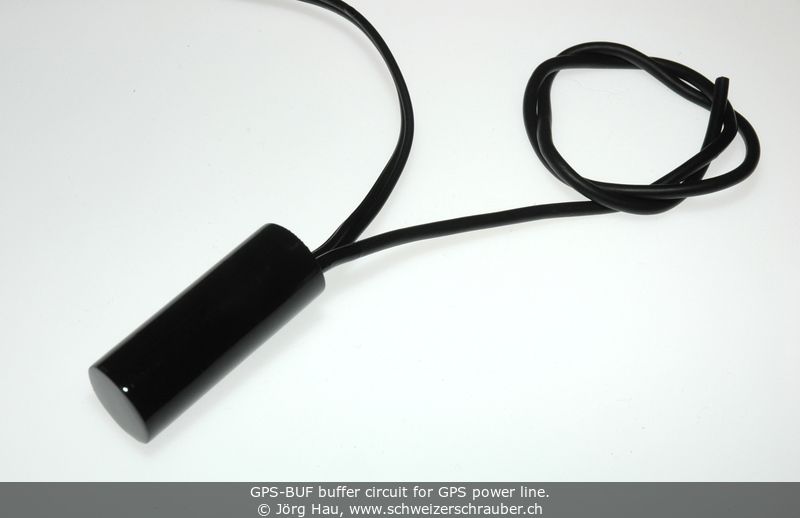
(Curious about the black cylinder? See below ;-)
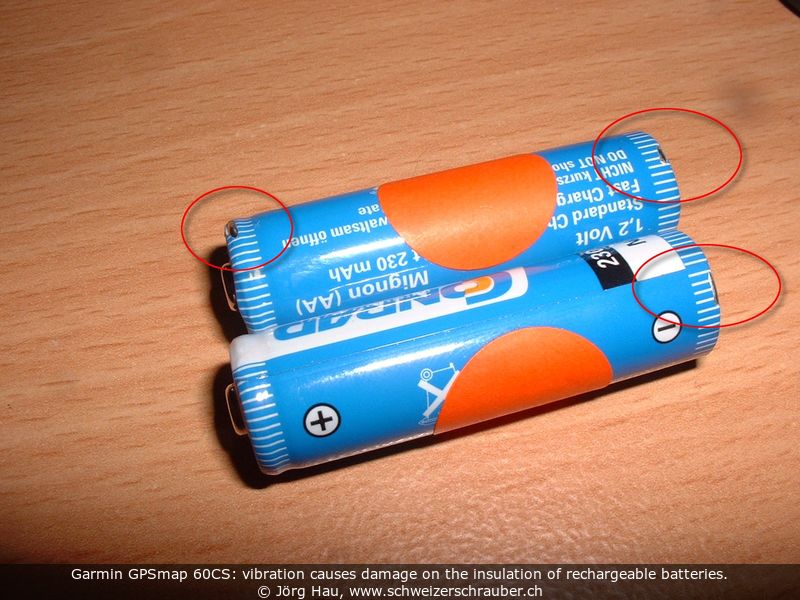
Why not avoid the hassle with an external cable and simply use batteries? Well, in terms of current consumption this is possible -
the 60CS and 60Cx can run about 12 h on a pair of AA-sized accus -, but vibrations will cause damage. The problem are not the occasional
"bumps" due to the road, but the high-frequency vibrations caused by the engine.
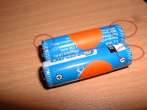
This picture shows a pair of AA accus that were brandnew and that have been used for about 3 h
in the 60CS: The insulation is already worn off in a few places. Reportedly, prolonged use on the motorcycle with batteries inserted
will also cause the contact springs to wear out. I have now added a strip of soft plastic foam inside the cover of the battery compartment,
but I avoid using the GPSr with batteries on the motorcycle.
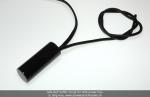
The black cylinder that is visible in the picture above holds a simple but
effective circuit to avoid a reset of the GPS when the engine is started. This reset seems to occur on
all BMW airheads that are equipped with Valeo starters and also on the Honda Africa Twin.
If you observe the same kind of GPS receiver reset on your motorcycle, feel free to drop me a mail:
I offer these units for sale.
The circuit works with all Garmin GPS of the "60" series and will certainly also work with
all GPSr that have similar electrical data. As an example, a customer with a Honda Africa Twin used it
successfully with a Garmin GPS12; the circuit was simply installed in the line between the original plug
(containing a voltage reducer/regulator) and the GPS receiver.
Quick Hints for the GPSmap 60
Most of these apply to the whole GPSmap 60 series:
- If you search in "nearest containing" and have already found what you are looking for, simply press PAGE.
This avoids the tedious moving of the cursor over to the "OK" button.
- To go the RECENT FINDS, no matter on which page you are: press FIND twice.
- Activating the MOB (man over board) function: Press FIND for several seconds.
- Diagnostics pages: hold ENTER+POWER (both!) while turning the unit. Press PAGE multiple times.
- To clear the almanac: hold PAGE while turning the unit on.
- To erase stored GPS calibration and waypoint information: hold MENU while turning the unit on.
- To perform a master reset: hold ENTER+PAGE while turning the unit on.
- Error reports: go to the trip computer page, then use the rocker pad and press UP, RIGHT, DOWN, LEFT (in exactly that sequence).
You should hear a beep after every keypress. The page that appears now contains e.g. error reports. - Use QUIT to exit.
See also: FAQ about Garmin Map60CS (link is dead?)
and FAQ for Garmin GPSMap 60Cx.
Creating and changing routes on the trip
A non-documented feature of the GPSmap series is the fact that you can create (and change)
routes with a "rubberband" function on the GPSr, just like in MapSource.
To create a new route from scratch:
- Go to the menu "Route" and create a new, empty route.
- Select "Map". A little indicator ADD is now shown next to the cursor.
- Move the cursor to the starting point (or add this point via any other menu, e.g. "recent find"). Press ENTR.
- Add more points by moving the cursor to that point and pressing ENTR. A line connecting with the previous point is drawn automatically.
- Press QUIT qehen you have finished your route - this brings you back to the "Route" menu.
To change an existing route:
- Go to the menu "Route" and load the route.
- Select "Map". The route will be displayed in straight segments at this time (note that you must not be in navigation mode).
- Move the cursor onto this line (the display will change), then press ENTR. A little indicator ADD is now shown next to the cursor.
- Drag the line in "rubberband mode" to the location you want to include in the route and press ENTR when you're done.
- To add more points, repeat steps 3 and 4 as needed.
The standard software for Garmin GPS units is Garmin MapSource. It is basically a software "framework" that is used to plan routes,
to upload data (maps, routes, waypoints etc.) to the GPS receiver and to retrieve track, waypoint and route information from the GPSR.
Over the years, Garmin has distributed a number of different map sets for use with MapSource. Some of these have routing capability,
some not; some can be used "as is", some require an unlock code (Garmin has a rather restrictive software license policy: Albeit you buy
the maps separately, you can not use them with any GPS you want - instead, the use is tied to the serial number of the individual GPS unit,
which is somehow coded in said unlock code). According to my knowledge, the status is as follows (early 2008):
- City Navigator: Has routing capability. Requires unlock code (and is thus bound to a particular GPS receiver via its serial number).
From 8.0 onwards, no second unit is allowed. Later Versions come as "City Navigator NT" and are not backward compatible.
- City Select Europe: Has routing capability. Requires unlock code (and is thus bound to a particular GPS receiver via its serial number),
allows 1 additional unit. Discontinued after v7 (2004) and replaced by City Navigator.
- Metroguide: Similar to Roads and Recreation (see below), with additional POI and address search.
Officially only routing capability on the PC (i.e., not on the GPSr), but it can reportedly be patched to provide
routing also on the GPSr. Discontinued after v9 (2009?) and replaced by City Navigator NT.
- Roads and Recreation Europe: Simplest version, but same detail of map data. No routing capability, no
unlock code required. Allows any number of GPS units; useful especially for GPSr with limited memory or without
routing capability. Discontinued after v4 (2004-01).
For me, the biggest disadvantage of Garmins MapSource software is that it is only available for Microsoft Windows platforms.
Garmin has never bothered to support Linux was announced and even support for Mac OSX took a very long time.
In 2008, I switched from a dual-boot system (Linux and Windows) to using 100% Linux.
Virtualisation allows to run Garmin MapSource in a Microsoft Windows environment, which itself runs in a virtual machine on the Linux host.
In other words, Windows in a window :-)
For details, see the description on the Linux and GPS software page.
In the past, I used to prepare a trip using paper maps. I then transcribed my route on a sheet of paper that was put in the tank bag,
alongside with the map of the current region. I have 20+ years of positive experience navigating that way. It works very well, but is also
means that you need to stop to turn the map (and/or the route sheet) around and that you are very dependent on the weather and lighting conditions.
Today, I continue to prepare a trip using plain paper maps. I can look at them for hours! I then "transcribe" my route into the mapping software
of the GPS unit and instead of the routing instructions on paper I upload that route into the GPSr. The GPSr's turn-by-turn directions will
then replace the paper sheet and allow to follow a planned route without being distracted too much from the traffic.
An additional advantage of this is that the electronic maps include all the detail to guide me through unknown cities, or on small country roads
that are only found on 50k maps. And since it is waterproof and backlit I don't care much about the weather ;-)
Route Planning with Garmin MapSource
As mentioned above, I do most of the route planning on the map and I also try to use MapSource in the simplest possible manner
(i.e. spend as few time as possible with it). Basically, I follow the advice that was given in
this thread at the ukgser forum (posting #10):
- Prepare most of the trip using paper maps.
- Once you have a good idea of the destination and of the points you want to see/ride on the way, switch on the computer and start the route planning software (here, MapSource).
- Create one distinct route for each day.
- Define the start and end waypoints for that day and then let MapSource calculate the route.
Due to the "special" routing behaviour of the GPSmap 60CS, tweaking of the "Routing Preferences" is not too useful,
but at least it pushes MapSource to generate a route that conforms with my riding style (think little gravel paths vs. transit day).
- Some "fine-tuning" of the route that MapSource generates is done with the "selection" tools in MapSource (i.e. the arrowhead):
Click once on the route - it will change colour -, then click on the place that you want to "rubber band" to. This tool is especially
useful to include that little twisty road discovered on the zoomed-in map ;-) and for application on the GPSmap 60CS,
I use this to add as many waypoints as are needed to keep the route. I then save this route, upload it to the GPSr,
and run a simulation there (reason: see the following section).
- For the next day, start with a fresh route.
Route Planning with Google Maps
Yet another route planner is available within Google Maps.
Just type "from:Bern to:Lausanne" in the address bar and the software will calculate and display a route.
You can then drag-and drop points along the route (if you have a fast Internet connection and wait a few seconds, the display will even reflect the changes on-the-fly).
Exporting to GPX can be performed using a script available at www.elsewhere.org.
Read GPS Coordinates from Google Maps
To get exact GPS coordinates of any location with Google Maps, proceed as follows (Desktop version):
- In any web browser, go to the Google Maps website and display a map of the desired location.
- Left-click the location, or right-click and select "What's here?":
a little window on the bottom of the screen will show the name of the location and, barely visible, the coordinates.
- These coordinates are a hyperlink: click on them.
- This opens a "destination panel", which displays the coordinates in several formats that you can copy. For GPX files, you want to copy the decimal format.
One particular "feature" of the GPSmap series that causes a surprise for many users is that routes, once they are uploaded into the GPSr,
are always recalculated. As mentioned above, it does not download the exact route you planned; instead it considers the route you composed
on the computer merely as a sequence of waypoints and the 60CS always calculates its own route.
Garmin's official explanation and workaround: "Mapsource and your unit use different algorithms so the GPS will have to recalculate the
route once transferred. The PC has a far greater processing capability than the unit, which is the reason for this."
Reproducing this behaviour in MapSource is not a trivial task, in particular since the calculation options between MapSource and the GPSr
do not match. As an example, MapSource has a "slider" to balance between minor and major roads that is absent in the 60CS and in turn the
latter has a setting "Calculation Method" with "Quickest, Quick, Better, Best" which is not available in the former. The differences in the
calculations are not always obvious and only show up once you upload and simulate the route ... which is pretty time-consuming.
Garmin's official workaround: "If you create waypoints in your route at certain locations where you want to go, when the GPS recalculates
the route it will still go to these waypoints. This means the majority of your route is where you want to go on your journey."
"The majority of your route is where you want to go on your journey." Hmmm. Considering the price that is asked for such a system,
I'm not sure if I enjoy that meaning ;-)
Indeed my current workaround is to leave the routing options in MapSource at the default values and merely adjust the key options
(e.g. avoiding Toll Roads, but allow Unpaved Roads). Then, when I plan a route using MapSource I manually define waypoints after important
intersections or locations and let MapSource recalculate the route.
If this fits my intended trip, I save and download the route to the GPSr and re-run a simulation there. Unfortunately this is quite a
time-consuming process, so if you know a sure way to make the route calculation in MapSource behave
exactly like the GPSmap 60 does, I'd be glad to hear about it ;-)
Another doubtful point is the definition of "highway". Most (European) users would probably expect that highway is equivalent to "Autobahn",
but as of fall 2006, MapSource's "highway" includes in Germany both Autobahn and Bundesstrasse.
While the latter is certainly intended to be a "fast road", it would be preferable to separate clearly between these both types - as an example,
when I'm on the motorcycle I don't mind taking a Bundesstrasse, but I certainly do not want to be routed over the Autobahn.
The third caveat is the choice of the routing options. Besides some "fine-tuning" (such as avoiding toll roads, U-Turns or unpaved roads),
the 60CS basically provides two options, "fastest" and "shortest". The "fastest" way will obviously favour major roads and highways, but may easily
(!) lead to a much longer distance. On the other hand, the "shortest" way will literally be the most direct way to the destination.
This sounds good, but may lead to some surprises; as an example, instead of taking the main road through a village it may direct you through some
industrial zone or residential area, even if it takes much longer (in time) than the main road. This can be a lot of fun if you have the time and
leisure ("now, lead the the shortest way home"), but it can also be annoying.
For most of my purposes, the "ideal" routing behaviour is indeed somewhere in between these two.
Conclusion: Whenever you recalculate the route, check the result carefully. Trusting the GPSr blindly may lead to huge detours.
- The GPSr must not distract you from riding. It should be placed at the same height as the instruments, or even higher, but still easy to reach with the left hand.
- I usually set the map scale to 800 m or 1200 m on country roads and zoom in when I'm in a city.
- Most GPSr displays are configurable. As an example, I have the "trip" display immediately before or after the "map" display,
allowing the display of my ETA etc. with a single keypress.
- I don't "play" with the GPSr during the ride. The buttons that I use while riding are essentially the zoom buttons (as mentioned above),
and sometimes the "trip" display.
- I always have the backlight on, albeit at a low level. Useful when it suddenly gets dark (tunnel).
- If you recalculate the route on the way (after a major deviation), check the overall result by zooming out before you start the trip.
During multi-day trips, it may happen that I want to upload updated GPX data, such as modified routes (-r) or new waypoints (-w), to the GPSr.
Again, this is possible using gpsbabel:
gpsbabel -w -r -i gpx -f somefile.gpx -o garmin -F usb:
Note that the order of arguments is important.
As stated in the manual, "options are always processed in order from left to right.
In practical terms, this means that things you want to read should appear in the command before things you want to write."
In other words, the following will not work:
gpsbabel -w -r -i gpx -o garmin -F usb: -f somefile.gpx
QLandkarte GT is an open source tool for handling geo data, such as GPSr data, maps and the like.
To use the GPSmap 60CX with QLandkarte GT on Debian Linux, you need to perform the following changes:
cat >> /etc/modprobe.d/garmin-blacklist.conf
blacklist garmin_gps
^D

cat >> /etc/udev/rules.d/51-garmin.rules
ATTRS{idVendor}=="091e", ATTRS{idProduct}=="0003", MODE="0660", GROUP="plugdev"
^D
... then reboot. In QLandkarte GT, under Setup > Preferences > Device, just select "Garmin" and "GPSMap60Cx", but leave the Serial Port empty.
You can now up- and download data from and to the GPSr.
— Note: This no longer works with QMapShack, the official successor of QLandkarte GT :-/
Note: if you have gpsd running (see below), you can use the live tracking feature in QLandkarte GT.
Please note that you actually need to enable live tracking (Menu > Live Log > Start), otherwise QLandkarte GT will display "GPS off"
- a feature that I found slightly misleading, since the GPS is actually on but just not logging.
gpsd is a GPS service daemon.
It is a great little piece of software that monitors one or several GPSr and makes the received data
(location, speed, course, ...) available to other programs.
On Debian Linux, installation is as simple as apt-get install gpsd gpsd-clients.
I happen to have a TomTom Bluetooth GPS module that I wanted to use with gpsd. Here is how I proceeded:
- On the computer, establish a normal Bluetooth connection to the GPSr (pairing code is usally 0000).
- Find the MAC address of the bluetooth dongle: hcitool scan. You should obtain something like 00:10:xx:xx:xx:xx
- Bind the GPSr to a suitable Bluetooth port, e.g. 4: rfcomm bind 4 00:10:xx:xx:xx:xx
- Now, a command like cat /dev/rfcomm4 should give some data (you may need to wait a few seconds). Ctrl-C to stop.
- Edit /etc/default/gpsd and set DEVICES="/dev/rfcomm4".
- systemctl restart gps && systemctl restart gpsd
At this point, you should be able to use programs like xgps to test your setup.
If this does not work, run gpsd in debug mode:
gpsd -N -D 3 /dev/rfcomm4
# this may throw an error "can't bind to IPv4 port gpsd, Address already in use", so:
systemctl stop gpsd
systemctl disable gpsd
systemctl stop gpsd.socket
gpsd -N -D 3 /dev/rfcomm4
# now re-test e.g. with xgps.
Note that the rfcomm port will likely be gone after a reboot of the device, i.e. you will need to repeat this step.
Instead of the dedicated GPSR module you can also use an Android phone, which can supply its GPS data to a computer connected via Bluetooth.
The process is almost the same:
- On the Android device, install the GPS2Bluetooth app.
- On the computer, establish a normal Bluetooth connection to the Android Phone.
- On the computer, find the MAC address of the bluetooth dongle: hcitool scan. You should obtain the MAC address of your phone (44:xx:xx:xx:xx:xx)
- On the phone, start GPS2Bluetooth and press START.
- On the computer, run the service discovery tool: sdptool browse 44:xx:xx:xx:xx:xx. In the long output, look for something related to GPS
(usually in the last lines ... or pipe the output to grep -B 1 -A 10 GPS) and note the channel number.
- On the computer, bind to a suitable Bluetooth port, e.g. 3: rfcomm bind 3 44:xx:xx:xx:xx:xx 6. Note the channel number (here, 6) as the last parameter on the command line.
- Now, a command like cat /dev/rfcomm3 should give some data, as above (you may need to wait a few seconds). Ctrl-C to stop.
- Edit /etc/default/gpsd and set DEVICES="/dev/rfcomm3".
- systemctl restart gps && systemctl restart gpsd
Sources: gpsd and
and bvargo.net and
forums.fedoraforum.org.
Software
- QLandkarte, allows to use your Garmin GPS with Linux and much more.
- GPS Visualizer, an on-line application that allows to draw your GPS data onto a map.